Hi there, lovelies!
This month’s post will be longer than usual. I bought a new notebook for my bullet journal and this post will contain the new setup. I am now using a Rhodia Goalbook, which I bought from a local stationery shop for Php 1250 (about $25).
Rhodia Goalbook + Review

– A5 size (14.5 x 21.0 cm)
– Soft leatherette cover
– Flexible spine, lays flat
– 90g ivory vellum paper, acid free
– 224 numbered dot grid pages
– 6-page index
– Undated annual calendar
– Undated monthly calendar
– Expanding back pocket
– 2 orange ribbon bookmarks
– Elastic enclosure
– 16 colors to choose from
I initially wanted a Scribbles That Matter notebook, but that’s not readily available here. Shipping cost from the US is more expensive than the notebook itself! So I got the next best thing.
My first criteria was the paper weight, in this case 90gsm. The main purpose of this is to lessen, if not eliminate, a lot of ghosting between the pages. I also want to use my other pens, which usually bleeds when used on my old journal.
The next criteria is the dotted pages. My old journal had blank pages. While I have all the liberty in terms of format, having to measure to make temporary lines proved to be too much work overtime.
After finishing my setup, I am quite happy with the notebook. There are a few pages where ghosting is visible, but it was not as bad compared to my old journal. I might have to pen test before using my other pens to avoid this. I guess my only “issue” is that the dots are too dark that I sometimes find it annoying! Or maybe it just needs getting used to.
New Setup
I only included pages that have been useful over the months and not those that served as mere decorations.

This notebook has a built-in 6-page Index, which I didn’t use or have on my previous journal. I will try to keep up with it since it’s already there.

This Annual Calendar is actually a good space to list all the birthdays, anniversaries, and/or holidays. I don’t have to write it in every month like I used to; and migrating to the next journal would be easier.

This Monthly Calendar (Future Log) I don’t have a use for right now. I had this on my other journal and I have not written anything in it at all!

For the Cover Page, I kept it simple. I might add something in the future, but will be keeping it like this until inspiration hits. 😉

My Goals page is new and improved compared to the one I had in my previous journal. I only transferred the ones that I’m still working on and edited the rest. I kept it at 3 items per category.
Below the goals are my Wish List and Bucket List for the year. Again, this is an edited version from the original.

I dedicated a page for my Bake List and Blog List where I can easily jot down all my ideas. Having it in one place is more convenient than adding it in every month.

This Master Grocery List was previously located at the back of my journal. I got too excited and forgot to make a header after I’ve drawn the columns. So I decided to cover it up and start over. I used a piece of water color paper to write down everything and pasted it to the “ruined” page. I guess that’s the difference from my old journal – it was spring bound, so I can easily just tear off the page if I made a mistake.

My Menu List are tried and tested meals for my husband and I. This helps me plan out our meals each month. I also had this at the back of my old journal.
Next is my Home Management List. This is an idea that came to me a few months ago. After 3 years of living in my condo, some of our appliances started to “break down” and needed some maintenance and repair. I guess I never really thought about maintenance. I thought if I use them properly and do my regular cleaning, they would be okay. I was wrong – learned it the hard way! I will be plotting these tasks on my monthly calendar so I don’t forget to do them.
The floral accents on all of these pages were inspired by My Life in a Bullet. I recently watched her June PWM on YouTube and I fell in love with her drawings. She is also one of the inspirations behind my July theme.
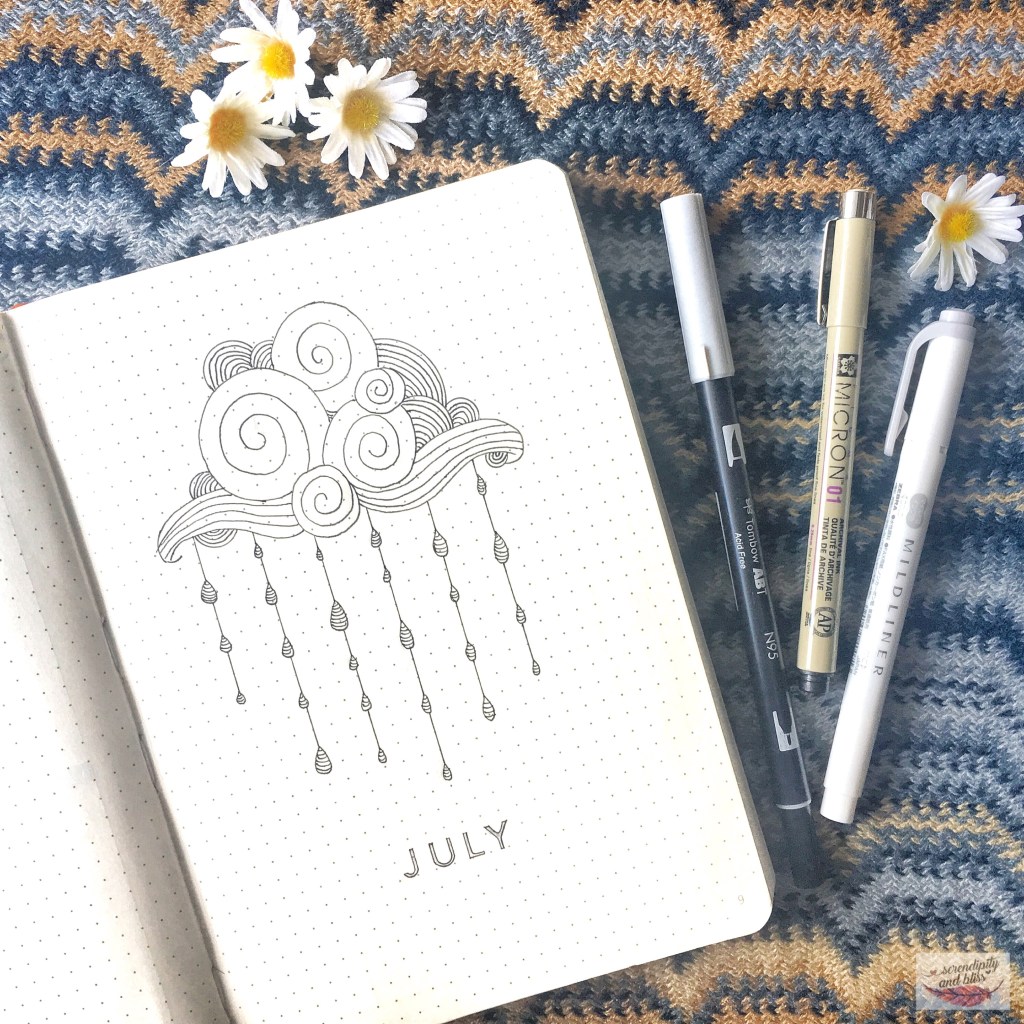
July Setup
This month’s theme is Rain & Clouds. When I bought my new journal in mid-June, it has been raining nonstop for 2 weeks here in Manila. It was very gloomy and cold all the time and that was the main inspiration for this month’s theme.
I rewatched My Life in a Bullet’s June PWM to get started on my new journal setup and was so inspired. I binged watched her other videos, too, and that’s where I saw her clouds illustrations from August 2017 PWM. I added the rain drops later on.
I am keeping it simple and mostly black, white and grey this month to keep with the gloomy theme.
 My Calendar this month is a two-pager. Since this notebook is significantly smaller than my old one, I can no longer fit a calendar in one page that would have enough space for what I want to do with it. I drew more of the clouds and rain drops on top with some swirls to signify wind. I also drew a girl with an umbrella standing in the rain on the side. I remembered a photo that Don took of me while we were on vacation that had that exact pose. The boots were a little wonky though!

This month’s Menu Plan is more condensed than usual. I went back to just listing down lunch and dinner meals. This proves to be the most efficient format.
Next is my business’ Expense Tracker. Like before, I wanted to see the total expenses and profit monthly. This is a new format. Let’s see if this works out.


The following pages are my Journal pages. I switched it up this month and went back to structured journaling pages. Although it took some time to finish, I enjoyed making these pages. Aside from using a rain drop washi tape on the first journal page, I drew in variations of the clouds and rain drops on the succeeding pages. I also tried different formats for the boxes to see which ones would fit best.
I am quite happy with how this turned out. Using a dotted and different sized notebook needs some adjusting to, but I am hopeful. I look forward to filling up this notebook upto the last page!

Supplies Used:
– Pigma Micron 005, 01
– Uni Pin Fineliner 08
– Uniball Signo White Pen
– Tombow Fudenosuke Pen, Hard Tip
– Tombow Dual Brush Pen N95
– Zebra Mildliner, Gray
– Various Stencils
– Raindrop Washi Tape
– Bullet Stickers
– Pencil / Eraser / Ruler
